


 US
US
 Canada
 Deutschland
 La France
 Nederland
 United Kingdom
A Complete Guide to Installing a Hitch Bike Rack
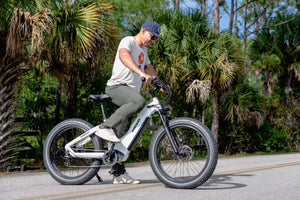
If you are like many Americans, you may have recently discovered or heard about the various benefits that come from electric bike ownership. Commuting, exercising, and leisurely riding around your neighborhood have never been easier for people of all ages.
However, there will come a day when you want to venture out further than your own neighborhood on your e-bike. Perhaps you want to take your family on vacation with your bikes to a cabin or you and your partner want to go on a cross-country sightseeing trip. Maybe you even want to do a solo ride far up north in your home state. There are many ways to travel with your electric bike. Wherever your destination, it may be too far away to simply ride there. Hitch bike racks are perfect for these occasions. Transporting bikes is much easier when you have a hitch rack.
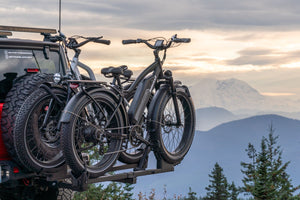
Most hitch racks hold two or four full-sized bikes and attach to the hitch of your truck, SUV, or car.
The rack will allow you to store more items or carry more people inside your vehicle while keeping the bikes safe and secure on the outside. Check out the short guide below for how to install a hitch rack and explore even more of the world on your e-bike.
The 5 Steps for Installing a Hitch Rack
- The first step to installing a hitch rack is ensuring you have the correct hitch receiver pre-installed on your vehicle. Many trucks and SUVs come with a hitch receiver, but some do not. You may need to purchase and install an after-market hitch to your car or SUV if you do not have one.
- Next, determine your hitch receiver size. Hitch receivers are rated by “Class”. There are 5 unique classes ranging from Class 1 and Class 2 hitches (which have 1.25-inch openings) to Class 3 or Class 4 hitches (which have 2-inch openings). Class 5 hitches are reserved for heavy-duty commercial vehicles. Note: if your hitch receiver is too wide for your rack, you can purchase an additional adapter to increase the size of your rack shank which goes into the receiver.
- Choose the correct hitch bike rack for your hitch receiver and assemble the rack according to the manufacturer’s instructions. Pick up and load the rack into the hitch receiver. You may want a second person to help you lift the rack if you are susceptible to back injuries. Most racks weigh less than 50 pounds.
- Once you have the bolt holes lined up from your rack and your receiver, insert the hitch bolt included with your rack and tighten it firmly with a wrench. The bolt should have a lock washer and/or flat washer included as well. Many racks will also have a “cotter pin” which you should now insert on the opposite end of the bolt from the head.
- Make any necessary adjustments to the rack itself before loading your bikes onto the rack. Be sure not to damage your car or bike when loading it into position. Tighten all straps and telescoping bar clamps over the frames or wheels. Push and pull firmly on the rack and bikes to ensure everything is securely attached and locked before driving.
Note: if you find that your bikes and rack are bouncing around too much while driving, you may want to use a strap or cord to provide additional stability. Some “play” (or movement) is acceptable when you encounter rough road conditions or turns.
The Advantages of Using a Hitch Bike Rack
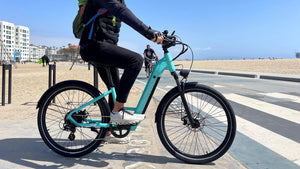
Hitch bike racks are perfect for adding more versatility to your vacations, exercise routines, or transportation abilities. Some parks or trails will be far away from where you live and will require a vehicle to get there. However, it can be cumbersome and difficult to load your bike inside your truck or SUV and you may damage the interior of your vehicle trying to do so. Instead, take your e-bikes anywhere you want with an external hitch rack. Having a properly installed hitch rack will give you the ability to use your e-bike in a wide range of locations and environments.
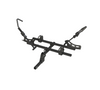
Himiway Hitch Rack
An excellent complement to any e-bike is the Himiway E-bike Hitch Rack which is compatible with the Himiway Cruiser, Escape, and Step-Thru. This hitch carrier holds two Himiway Cruisers or one Himiway Escape (because the Escape is a bit heavier). One of the best features of this bike rack is the ability to fold up and down into three different positions to get it out of your way when not in use or allow access to your vehicle without taking the rack off. This compact feature also makes it easy to store in a garage, shed, or basement when not in use.
A best practice is to remove the e-bike batteries before loading the bikes into the rack. You will not want your batteries moving around and weighing down the rack as you drive down the road. This specific rack fits 2-inch receivers only so be sure to re-read Step 2 above and determine the proper receiver you’ll need (which should be a Class 3 or Class 4 receiver). The Himiway E-bike Hitch Rack weighs about 45 pounds and can be moved by one person. If you are older or concerned about an injury from lifting, you can also use a second person to move the rack.
It is not too late to plan a summer getaway with your e-bikes, and with the 5 easy installation steps above, you’ll be able to travel anywhere your vehicle can take you by using a rack like the multifunctional hitch rack from Himiway. Be sure to check out our helpful guide on the 6 Things to Remember When Planning a Trip with an Electric Bike. And as hunting season is approaching, you may also want to bookmark our recent guide 5 Tips for Efficiently Hunting on an All-Terrain Electric Fat Tire Bike. No matter the trip you plan, a high-quality hitch rack will give you the most travel options!